MySQL: changing the storage location for databases

WEBBY STUFF 1 Comment »

By default when you install MySQL it stores databases on the C drive, you can change this during installation but perhaps you forgot to change the data files path during installation or completely missed the option to do this, or perhaps you used the Web Platform Installer which doesn't give you any option to change the data files path.

On windows 2008 the datadir is “C:\ProgramData\MySQL\MySQL Server 5.5\data”

This is generally not the best idea as your c drive should be only for the OS and installed programs, you should put all your data on a different drive and keep it separate from the OS. So if you find yourself needing to change this after installation, here is how.

Open your my.ini file

On windows 2008 this is in C:\ProgramData\MySQL\MySQL Server 5.5\”

On other windows version just look at the mysql service properties to find out where the defaults-file is.
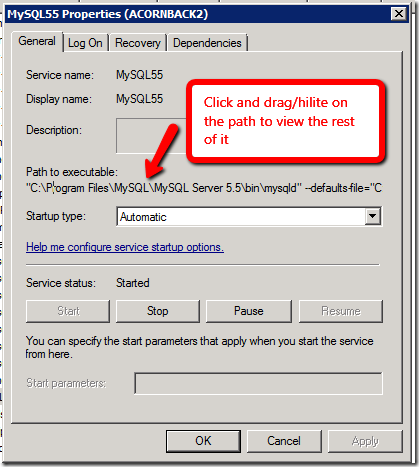
mysql-service

now find the “datadir” parameter and change it to where you want to store your databases.

E.G.
datadir="D:\MySQL\data\"

Now STOP the MySQL service.

Now you must copy the original data directory to the new location.

E.G.
copy “C:\ProgramData\MySQL\MySQL Server 5.5\data” to “D:\mysql\data”

now restart MySQL.

If the service fails to start, double check that you have entered the path correctly in my.ini and that the path exists, and that all the data files have copied across properly.

Check your new data folder permissions and make sure it has “NETWORK SERVICE” with full permissions. On Windows 2008 these permissions may not exist by default.
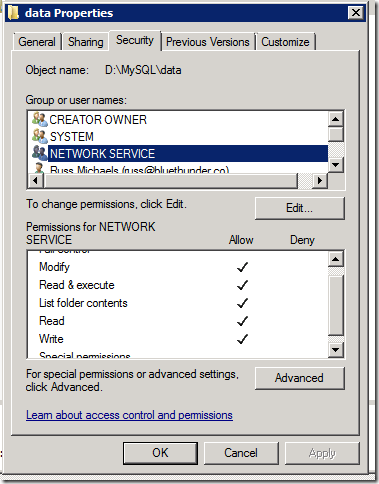
mysql_data_dir_permissions

Allow Kayako Fusion to search 3 letter words

Kayako No Comments »

You may have noticed that if your search your knowledgebase certain articles do not show up, such as if you search for “FTP” or “VPN”, you get nothing.

This is because MySQL by default does not index words with less than 4 characters, which is for performance issues.

To get around this you need to edit your my.ini file or whatever file contains your MYSQLD settings.

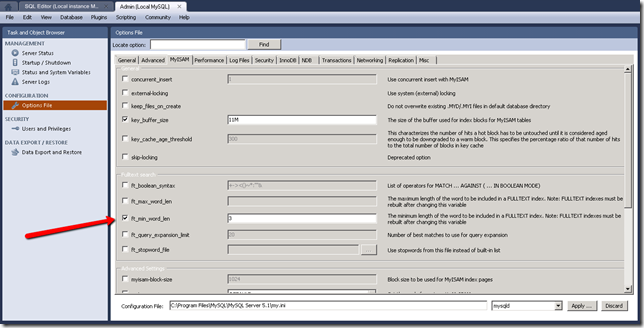
Find the following setting: ft_min_word_len
and change it’s value to 3.


If your using MySQL Workbench, then see this screenshot.
mysql_admin

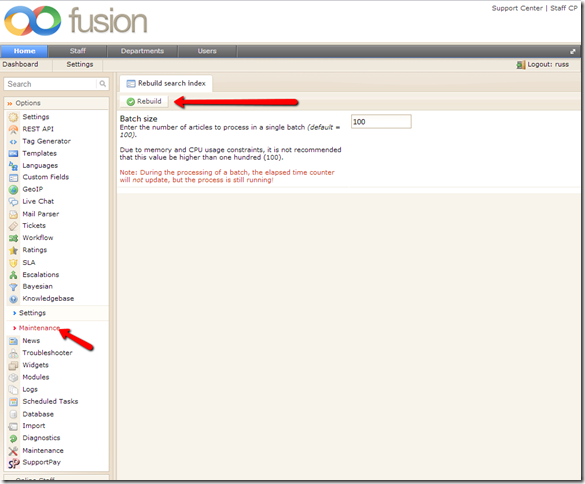
You then need to rebuild your KB index, login to your FUSION admin, go to Knowledgebase –> Maintenance and click rebuild.

kayako_rebuild_kb_index

You should now be able to search and find articles using 3 letter words.

If it still doesn’t work, then you may need to REPAIR the tables “swkbarticles” and “swkbarticledata” which will re-index then using the new value.

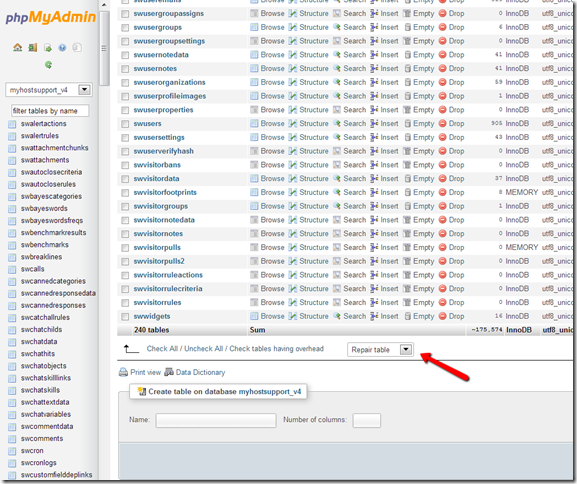
In PHPMyAdmin, go tot he table view, check the 2 mentioned tables, scroll down to the bottom and choose “repair” from the dropdown list.

phpmyadmin_repair_table

Kaykao fusion v4 Bugs and Gotchas

Kayako No Comments »

We recently(ish) updated our helpdesk from Kayko v3 (SupportSuite) to V4 (fusion), yes they also renamed it as well just to be awkward, shouldn't have then started with FUSION version 1.0 in that case ?
While FUSION has a lot of features, a lot of them have bugs and don;t work well with each other and considering how many issues I have found, I have to assume most customers only use Kayako’s product in a very simple way and do not make use of all the features to the extent that I do.

Anyway as the months have gone by I have found various issues, differences, bugs and gotchas, which I thought I would start recording on my blog for anyone else that upgrades and finds themselves with these issues, not to mention for my own reference.

I strongly suggest that you check your PARSER LOG on a daily basis for emails which have been blocked/rejected until you have your system finely tuned and working perfectly.

As usual the Kayako support has been a frustrating struggle to work with as I predictably always have to explain to them how their own product works, how email works, why their answer is wrong and why my issue really is an issue and often end up find the workaround myself anyway.
The number of times I have to explain to them that any email with the word “automated” in it, does not mean it is an auto reply sent by an auto responder, SIGH!

Anyway here is the list so far.

  1. Force Queue on Incoming Emails
    Email queues have this new setting which is enabled by default. If Enabled, the system will force all emails in the mailbox to use the same queue from which the mail is being downloaded. If you use email aliases for different depts, this will screw that up and emails will all end up in 1 dept.
  2. No more Private/Public alerts
    In V3 every user could setup their own alerts and choose what their received emails about, and no-one else could edit these.
    This has gone now, and there are only global notifications that everyone can view and edit. This makes setting up alerts only for a specific person more of a PITA.
  3. Delivered to headers are not parsed
    If you have emails (such as monitoring or alerts) which get sent to a customer and also bcc’d into your ticketing system, and you create a parser rule to allow these emails in and bypass your other rules, it may not work. Currently you need to modify the parser code to make it process delivered-to header.
    To allow parser rules to work on "delivered to" header.
    1. Edit the class.SWIFT-Mime.php and find this line around 258
      foreach (array('to', 'cc', 'x-rcpt-to','bcc') as $header)
      change to
      foreach (array('to', 'cc', 'x-rcpt-to', 'delivered-to','bcc') as $header)

  4. Catch-all rules do not work as expected
    If you have a catch-all rules to simply accept all emails from a certain address, e.g.
    /^alerts\@.*$/i
    Then this will not work, and the email will still be rejected by other criteria.
    This reported as a bug.
  5. Parser rules not executed in correct order
    If you need them to run in a specific order then you may find emails being rejected. This is reported as a bug and there is a FIX available on their site.

more to come..

How to get around tag restrictions in MangoBlog editor

ColdFusion , Railo No Comments »

MangoBlog uses TinyMCE editor when adding/editing articles and pages, which by default will strip out certain tags, including iframe tags, which I needed for posting youtube videos.

The solution is actually very simple.

open up the admin/editorSettings.cfm

and add the following line with any tags[parameters] you want to allow.

extended_valid_elements : "span[class|style],code[class],iframe[src|width|height|name|align|frameborder|scrolling]",


In addition if you have “script protection” enabled, then this will replace certain tags (such as iframe) with the text “InvalidTag”. Either your ColdFusion/Railo Admin has Enable Global Script Protection turned on or your Application has scriptProtect set to true. This would be set in either the CFAPPLICATION tag or the This scope of your Application.cfc file.

below is the full code with my amendment.


<!-- TinyMCE --> 
<script type="text/javascript" src="assets/editors/tinymce_3/jscripts/tiny_mce/tiny_mce.js"></script> 
<script type="text/javascript"> 
    <mangoAdmin:Event name="beforeTinyMCEinit" /> 
    tinyMCE.init({ 
        mode : "specific_textareas", 
        editor_selector : "htmlEditor", 
        theme : "advanced", 
        plugins : "table,save,contextmenu,paste,noneditable,asffileexplorer", 
        entity_encoding : "raw", 
        theme_advanced_toolbar_location : "top", 
        theme_advanced_toolbar_align : "left", 
        theme_advanced_path_location : "bottom", 
        theme_advanced_buttons1 : "bold,italic,formatselect,styleselect,bullist,numlist,del,separator,outdent,indent,separator,undo,redo,separator,link,unlink,anchor,image,cleanup,removeformat,charmap,code,help", 
        theme_advanced_buttons2 : "", 
        theme_advanced_buttons3 : "", 
        paste_remove_spans: true, 
        extended_valid_elements : "span[class|style],code[class],iframe[src|width|height|name|align|frameborder|scrolling]", 
        theme_advanced_resize_horizontal : false, 
        theme_advanced_resizing : true, 
        relative_urls : false, 
        remove_linebreaks : false, 
        strict_loading_mode: tinymce.isWebKit, 
        document_base_url : "<cfoutput>#blog.getbasePath()#</cfoutput>", 
        <cfif len(currentSkin.adminEditorCss)><cfoutput> 
        content_css : "#blog.getbasePath()#skins/#blog.getSkin()#/#currentSkin.adminEditorCss#", 
        </cfoutput></cfif> 
        <mangoAdmin:Event name="tinyMCEinit" /> 
        <cfoutput> 
        plugin_asffileexplorer_browseurl : '#blog.getSetting('urls').admin#assets/editors/tinymce_3/jscripts/tiny_mce/plugins/asffileexplorer/fileexplorer.cfm', 
        plugin_asffileexplorer_assetsUrl:'#fileUrl#', 
        file_browser_callback : 'ASFFileExplorerPlugin_browse' 
        </cfoutput>, 
        onchange_callback: function(editor) { 
            tinyMCE.triggerSave(); 
            $("#" + editor.id).valid(); 
        } 
    }); 
    <mangoAdmin:Event name="afterTinyMCEinit" /> 
</script> 
<!-- /TinyMCE –>


Railo and Mura installers in WebsitePanel 2.0

News & Gossip , Railo , websitepanel 3 Comments »

I am currently beta testing the latest WebsitePanel 2.0 release, which has a some great new features thanks to Helicon who have contributed support for their ZOO engine. Helicon ZOO is what I currently use to provide Railo hosting over on cfmldeveloper.
Below are some videos showing the new features, which as you can see make installing Railo and Mura a synch.
The new features will be available on CFMLDEVELOPER when the Beta is released and when our host BlueThunder do the upgrade.

Railo installer


Easily install Railo on your server via WebsitePanel.


Railo Project Template


Enable Railo on your website by installing a template project and enabling the Helicon Zoo module.


Mura Installer


Easily install Mura on your site via Microsoft Gallery installer.

Powered by Mango Blog. Design and Icons by N.Design Studio
RSS Feeds