 I recently decided to try out the latest Windows 7 RC2 on my old PC seeing as I had migrated everything over to my new Windows 2008 server which I was using as a workstation. This plan has now turned into a fully fledged windows 7 RC2 as my primary workstation since my new 2008 machine decided to totally die, which is rather annoying as all the hardware is actually relatively new, the motherboard was 2 years old, but only just came out of the box recently and that appears to been the catalyst. Anyhoo being without a PC for any length of time is of course not an option for me so I have started to give windows 7 a good test and thought I would report my findings so far.
SYSTEM (32Bit)
Motherboard: Intel D915PBL
CPU: P4 3.0 ghz
Memory: 3gb (2.75 usable)
Graphics: NVIDIA Geforce 7300GS
I would have gone for 64bit but my hardware doesn't support it.
Which gives me a Windows Experience Index of 3.5, which is pretty good for such an old system.
The system actually runs just as fast as a newly installed windows XP with all the 3D and aero effects enabled, much better than windows vista performed on my newer core 2 duo system.
All hardware was detected automatically, I have not had to manually install any drivers so far.
All the software I have installed so far has not had any major issues and has generally been working. If there have been any compatibility problems then windows has informed me of this fact and has re-installed the application in windows XP compatibility mode instead, which resolved the problem.
What's Cool
 Well if looks cool, essentially windows 7 is a cleaned up Vista with the pointless fluff removed and made to run fast. Aero is still there but it is faster and some of the pointless effects are simplified, turned off by default or have been removed. The windows minimize and maximize for example seems much faster and simpler, the task swapper pops up a windows with a thumb of each task, and as you toggle through the tasks with ALT-TAB or point your mouse at them, the screen changes to preview that app, but will only change to that app if you stop/click on it, otherwise it reverts back to the original app, certainly does the job nicely without the need of that silly 3D rotating gallery that vista had.
The taskbar has also had a welcome overhaul, it now combines the quick links and open applications together. You can pin any application to the taskbar much like you would have added it to the quick links toolbar, but now once you click that link to open it, it then becomes an active application on the taskbar, and clicking on it or mousing over it will show a task switcher just for that applications open windows, which is very handy for things like Internet Explorer or Windows Explorer where you will have more than one open window. It also does a very slick morph between the task switcher windows as you move between apps, all very slick and very smooth and really works well.
There are also some rather natty little tools included with windows 7 which come in very useful.
Snipping Tool
 You can use Snipping Tool to capture a screen shot, or snip, of any object on your screen, and then annotate, save, or share the image. Simply use a mouse or tablet pen to capture any of the following types of snips:
Free-form Snip. Draw an irregular line, such as a circle or a triangle, around an object.
Rectangular Snip. Draw a precise line by dragging the cursor around an object to form a rectangle.
Window Snip. Select a window, such as a browser window or dialog box, that you want to capture.
Full-screen Snip. Capture the entire screen when you select this type of snip.
After you capture a snip it is automaticallyatically copied to the mark-up window, where you can annotate, save, or share the snip.
I certainly find this very handy indeed as it saves me having to install any 3rd party apps to do this.
Sticky Notes
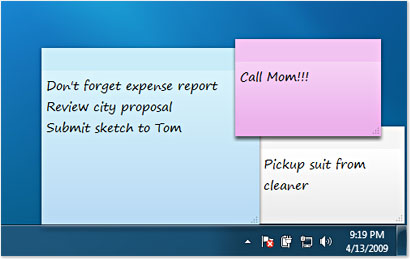
 Already as necessary as pencils and paper clips, Sticky Notes just got more useful. In Windows 7, you can format a note’s text, change its colour with a click, and speedily resize, collapse, and flip through notes.
If you've got a Tablet PC or a touch screen, Windows 7 Sticky Notes support pen and touch input, too—you can even switch between different input methods within the space of a single note. Sticky Notes is available only in the Home Premium, Professional, and Ultimate editions of Windows 7. OK so it is nothing new and there have been apps like this around forever, but it is again nice to have this built in and handy for those people who never used any 3rd party note apps and still use pen and paper. For those that want something extra then there is still Microsoft One note.
Magnifier
The new magnifier I find works really well and finally how such a tool should work. Instead of just magnifying a small part of the screen as it worked in XP, it now magnifies the whole screen and scrolls the screen around with your mouse pointer, being short sighted myself I found this very handy. You still have the option of a magnifying lens of docked zoom window if you prefer.
Overall I am impressed, windows 7 seems to have the bells and whistles that you see on the Mac or Linux without being bloated. If you have an older machine that runs XP just fine but wont run vista, or even a newer machine that runs like a dog with Vista, then it will most likely run windows 7 just fine, at worst you may need a better graphics card for the aero FX or just turn them off, but based on my experience so far I certainly wouldn't waste my time with Vista now.
SOFTWARE
Here is the software I have installed so far, I will update this list as I go along.
Microsoft Office 2007 – for some reason outlook would not send and receive after I copied all my files and settings from old pc and Ihad to import my massive PST and recreate all my rules, acocunts, sigs etc, but that may not be a windows 7 issue.
Windows Live apps
7-zip
ColdFusion 8
Free Download Manager
Genie Backup Manager
eWallet
Kaspersky Antivirus 8 (technology preview for windows 7)
Adobe Reader 9
PrimoPDF
Adobe Coldfusion Builder
Plaxo
Adobe Air
Tortoise SVN
CF Builder Beta
sync Center
Skype
Plaxo
Beyond Compare 3


 The other issue was of course connecting up 2 disks to my notebook in order to copy them, for this I used Easy IDE, which allows you to connect any IDE disks to your USB port. the easy IDE worked great for copying my 2.5" IDE notebook drive, however I have since tried to use it to connect up old 3.5" IDE disks and it has not done a very good job of recognising them, maybe they are too old.

 I recently decided to try out the latest Windows 7 RC2 on my old PC seeing as I had migrated everything over to my new Windows 2008 server which I was using as a workstation. This plan has now turned into a fully fledged windows 7 RC2 as my primary workstation since my new 2008 machine decided to totally die, which is rather annoying as all the hardware is actually relatively new, the motherboard was 2 years old, but only just came out of the box recently and that appears to been the catalyst. Anyhoo being without a PC for any length of time is of course not an option for me so I have started to give windows 7 a good test and thought I would report my findings so far.
 Already as necessary as pencils and paper clips, Sticky Notes just got more useful. In Windows 7, you can format a note’s text, change its colour with a click, and speedily resize, collapse, and flip through notes.


Recent Comments