I am often seeing posts about this topic on lists, and have been asked to document it a few times, so here goes.
NB: this is tested on windows 2003 servers running ColdFusion 7 only, and presumes knowledge of windows server administration.
For details of creating new instances with ColdFusion MX 6 please see http://www.bpurcell.org/macromedia/coldfusion/multiple_instances.cfm
For creating multiple instances using APACHE, see http://nil.checksite.co.uk/index.cfm/2006/5/2/CFMX-MultiServer-Set-up
Deploying a new instance of JRUN/CFMX from the ColdFusion administrator is easy, but you need to take extra steps if you truely want to isolate those instances from each other and make them secure.
It is important to note that any changes you make to the default [cfusion] instance will be replicated to any new instance you create from the ColdFusion enterprise manager as it simply copied the [cfusion] instance. So any DSN's, mappings etc will be duplicated.
If you do not want this to happen, then do not ever makes any changes to the default instance via the ColdFusion Administrator. Keep it as a base template and stop the service when you are not using it. when you want to create a new instance, start the [cfusion] instance and login to the CFAMDIN.
- Create the instance
- Login to the ColdFusion Administrator of the default instance
- Got to Enterprise manager -> instance manager
- Add a new instance.
Server name: enter somehting meaningful here
Create Windows Service: check this box
Auto Restart Service: check this box
- Now we need to setup permissions and access for this instance
- Create a windows security group called "CFMX Instances" from the windows computer manager.
- Give this group FULL access to your JRUN installation path, plus any other paths that ColdFusion will need global access to, such as the SMTP mail drop folder (if you are using the windows SMTP service), temp windows folders, the fonts folder (required for cfdocument) etc.
- Now create a new windows user for this instance, preferably using the instance name or clients username
Set password to never expire
Remove remote desktop/terminal services access
make user a member of the group "CFMX Instances" that you created above - Create a folder for this customer/instance on your data drive, all web sites for this instance will go here.
E.G. " D:\wwwroot_instance_name" - Edit permissions for this folder, and give the user created in step 3 FULL permissions.
- Edit the windows service that coldfusion will have created (e.g “Macromedia CFMX AS Instance Name ”, and set it to Log On as the user created in step 3.
- Copy the CFIDE folder from the default instance (E.G. C:\inetpub\wwwroot\CFIDE) to this new folder, E.G. "D:\wwwroot_instanceName\CFIDE", and delete the folders "administrator" and "AdminAPI" from within this folder. This should be used as the CFIDE virtual directory for any sites created on this instance.
- Enabling sandboxing
By default sandboxes will not work in multiserver mode, so if you require this we need to enable this.
- make a backup of the jvm.config file :\jrun4\bin\jvm.config
- Edit jvm.config and replace the arguments section with the following. Copy and paste this exactly there should be no additional spaces or carriage returns.
For the default jvm.config
# Arguments to VMFor additional instances with their own JVM.config
java.args=-Xms512m -Xmx512m -Dsun.io.useCanonCaches=false -Djava.security.manager -Djava.security.policy={application.home}/servers/cfusion/cfusion-ear/cfusion-war/WEB-INF/cfusion/lib/coldfusion.policy -Djava.security.auth.policy={application.home}/servers/cfusion/cfusion-ear/cfusion-war/WEB-INF/cfusion/lib/neo_jaas.policy
Replacing [instance name] with the name of your instance.
# Arguments to VM
java.args=-Xms512m -Xmx512m -Dsun.io.useCanonCaches=false -Djava.security.manager -Djava.security.policy={application.home}/servers/[instance name]/cfusion.ear/cfusion.war/WEB-INF/cfusion/lib/coldfusion.policy -Djava.security.auth.policy={application.home}/servers/[instance name]/cfusion.ear/cfusion.war/WEB-INF/cfusion/lib/neo_jaas.policy
some additional info on creating custom jvm.config files can be found here
http://www.macromedia.com/cfusion/knowledgebase/index.cfm?id=tn_18206
- Updating windows services for custom jvm.config files
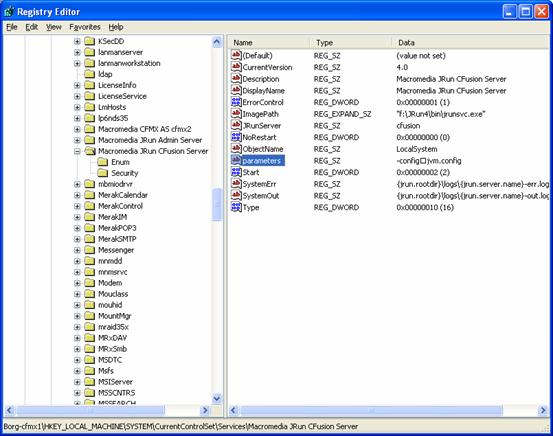
If you have given a jrun instance its own config file then we now need to edit the windows services for those instances to use this new config file. - run REGEDIT
- Edit the following KEY. HKEY_LOCAL_MACHINE/system/CurrentControlSet/Services
- Select the service “Macromedia JRUN [instance name] Server”
- Edit the Parameters attribute, if it does not exist, create it (add new string value). Set the value of this to “-JVM_[instance_name].config” or whatever you name your new config file.

- Repeat this step of each Coldfusion service that has it’s own config file.
- Test that sand boxing works.
- From the default CFAMDIN, go to the instance manager and launch the CFADMIN for the instance you just added. It will have the same password by default.
The sandbox settings get copied over from the default instance if you made any changes, so disable sand boxing and remove anything that shouldn't’t there. Do the same for mappings, data sources, custom tag paths, verity collections etc.
Now change the cfadmin password.
I have however noticed that Flash Remoting doesn't work unless you use the default CFIDE folder, so this may be an issue for you. In which case you will need to give the "CFMX Instances" group access to the default c:\inetpub\wwwroot\CFIDE folder as well.
By doing the above, each instance will now only have access to the specified folder
E.G. " D:\wwwroot_instance_name"
and each web site for this instance should be created inside this folder
E.G.the home directory for a site would be " D:\wwwroot_instance_name\domainName.com\wwwroot"
So web sites for this instance will not be able to access files/folders above " D:\wwwroot_instance_name". And if you implement sandbox security, this will further restrict CFML code from being able to access files/fodlers above its home directory.
You should only ever restart any instance that has its own config file from the windows service manager. If you restart the instance from the CFADMIN or the JMC it will be started using the default jvm.config file.
Configuring IIS to use your new instance
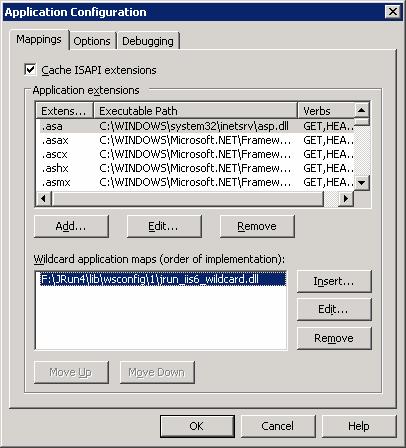
CF is enabled at the master level in win2k3 by a wildcard mapping in the IIS master properties. This will be applied to all new sites.
For sites added to a dedicated instance, you need to edit the wildcard mapping to point to the correct jrun_iis6_wildcard.dll connector for that instance.
The default for example will be
:\JRun4\lib\wsconfig\1\jrun_iis6_wildcard.dll
The \1\ Is connected to the instance number (sort of). A new folder (connector) is created after you use the web server configuration tool to link an instance to a site, so you may end up with more connectors than instances, I have never figured out why this happens and why the WSCONFIG doesn't just use an existing connector.
Run the web site configuration tool (start/programs/macromedia/coldfusion mx), and use this to apply the instance to a TEST site in IIS. (note this requires shutting down the WWW server service). A new connector will have been created in the wsconfig folder as above.
You can then view that web sites application mappings to see where the wildcard mapping points to. You can also open the wsconfig.properties file which will now also have an entry for the new instance/connector showing which path to use.
Stick a sample CFM page in the test site to make sure it is working. If it works, you should then STOP the instance you just created, the page should then no longer work, proving that the test site is using that instance.
Take note of the connector number and the path to the .dll as you will need this if you want to manually map any future sites to this instance rather than using the config tool .

For any new sites you create which you want to use this instance, just copy the above ISAPI filter mapping. you can use the wsconfig tool again to do this, but I find it gets confusing when you have too many connectors and do not know which one applies to which instance. If you only use the WSCONFIG tool once for each instance, then you will only have one connector file/folder for each instance.
The manual creation of web sites and assigning them to specific instances and making sure they are in the correct folders and using the correct mappings can be an arduous task and prone to error, so if you host a lot of web sites I highly recommend the use of the HELM hosting control panel, which we (CFMX Hosting) use to completely automate this process.


Jul 11, 2006 at 6:24 PM We've found that if your MS Windows server is in a domain, the account CF runs under nees to be a domain account. FYI...YMMV
DK
Dec 12, 2006 at 5:31 PM we've done what was shown here - as well as having these users being domain accounts etc, and running the cf services as those instance users.
I am however getting this message in the windows logs after a restart of an instance:
"Win32 API routinue "CreateFile" failed: Access is denied."
source: Macromedia CFMX AS xxxx
cateogry: none
event iD: 256
type: error
Seems like there is somewhere that needs permission that isn't being granted somewhere on the server??
Dec 12, 2006 at 5:40 PM download filemon from sysinternals.com which should show you where the accessdenied message is coming from.