Plugin updates fail on wordpress and other PHP apps resulting in locked files.

WEBBY STUFF , Windows 2008 Server No Comments »

If you are running windows 2008 server with IIS 7 then you may have noticed a problem with your PHP apps such as Wordpress or Joomla when you try to perform updates.

The problem occurs when the old files are deleted, the delete fails to complete leaving the files/folders in a locked state and you are then unable to do anything with them at all.

this problem has been plaguing me fore a few months and solution has been to use a file unlocker tool to release the lock.

I have recently found the cause for this to be the Wincache extension for PHP, you can find more details and a fix HERE.

Windows Live Writer "blogger.getUserBlogs" error

WEBBY STUFF 4 Comments »

I run numerous blogs, one of which is Wordpress, and I prefer to post to them using Windows Live Writer.

However after a recent update to Wordpress I found I could no longer post with Live Writer or even connect at all in any way, I would get the following error.


the response to the blogger.getUsersBlogs method received from the blog server was invalid

I spent ages Googling for a solution to no avail, but the general consensus is that the problem is caused by an extraneous space or newline in one of the PHP files outside of the <?PHP> tags. I searched all of the suggested files to no avail. So I decided to try and work out the cause myself.

I use a tool called Fiddler to monitor HTTP traffic to and from my computer, so I used this to look at the request and response going from Live Writer to Wordpress.

So with fiddler running I tried to update my account settings, this returns the entire HTML of the entire blog, so is not helpful in determining the cause of the problem, next I tried making a post instead, this returned something more useful and showed me the cause of the problem. To do this yourself, try to post to your blog and then check the result in fiddler in the Inspectors/TextView tabs.

Here is the response that came back from wordpress.


<?xml version="1.0"?>
<methodResponse>
  <params>
    <param>
      <value>
      <array><data>
        <value><struct>
          <member><name>isAdmin</name><value><boolean>1</boolean></value></member>
          <member><name>url</name><value><string>http://blog.bluethunder.co/</string></value></member>
          <member><name>blogid</name><value><string>1</string></value></member>
          <member><name>blogName</name><value><string>BlueThunder Blog</string></value></member>
         <member><name>xmlrpc</name><value><string>http://blog.bluethunder.co/xmlrpc.php</string></value></member>
       </struct></value>
      </data></array>
      </value>
    </param>
  </params>
</methodRespons


As you can see the final tag is not closed properly, it is missing 2 characters "e>".

So it would appear that indeed some extraneous characters are indeed being added somewhere which means that the content is not matching the content length, so I decided to see if there was anyway I hack a fix for this as finding these extraneous characters was clearly impossible.

After a lot of searching I finally found a solution.

In the wp-includes folder there is a file called class-IXR.php, and around line 472 you will find the following code which sets the content length.

image

now as the content is 2 characters shorter than it should be, we want to add 2 to this by changing the highlighted line like so.


header('Content-Length: '.$length+2);


If your content is missing more than 2 characters then add the appropriate value.

Voila, my Live Writer is now able to post to Wordpress again.

SSMS Tools Pack 2.0 for SQL Server

SQL Server No Comments »

You know all those little things that make you crazy when you’re developing in SQL Server Management Studio? Those pieces of functionality that you just can’t understand why Microsoft didn’t just include it? Stuff like generating a set of CRUD statements (Create, Read, Update Delete), or running custom scripts right from the SSMS GUI, or even a way to analyze execution plans rather than read through them? Yeah, Mladen Prajdic felt exactly the same way. Except unlike the rest of us, instead of sitting around moaning about how the software doesn’t do this or that for me, Mladen just started building it for himself. Then he went one step farther, he let the rest of us have it too. That’s right, SSMS Tools Pack is a free piece of software that patches over a lot of the little cracks in SSMS (although I’m certain that Mladen wouldn’t mind contributions if you really love his work). It works with SQL Server versions from 2000 to Denali and it does everything that it does working directly within SSMS so you can stay well and truly inside your comfort zone, developing with the toolset that you’re used to. In fact, SSMS Tools Pack will quickly become one of those pieces of software that you won’t want to live without.

Download and Install

When I heard that a whole new version was becoming available, I couldn’t wait to try it out. I downloaded it the first day it was available. Here is the exhaustive list of actions and requirements to download the software:

That’s right. No registration, no email address, no home phone, none of the standard stuff that you have to supply in order to get a piece of software. Did I mention that this is free software and that Mladen doesn’t really want to know who you are in order to supply you with it?

After you launch the installer, it will recognize what version of SQL Server you have installed on your desktop. I tried the install on a 2008R2 instance and on a Denali instance and didn’t have any troubles with it whatsoever.

On the Denali instance, I had SQL Server Management Studio open when I did the install. I didn’t get any error messages, but when I went to SSMS I also didn’t see any of the new tools available. Upon restarting SSMS, the tools loaded right up.

Functionality

There’s a shocking amount of functionality built into this piece of software. Because it covers so much different functionality trying to find a handle for how to approach the evaluation isn’t entirely simple. So, with the full set of functionality in front of me, I’m going to cover the stuff that I find cool or intriguing. If I leave out your favorite function, there’s your chance to post a comment or write up an article of your own.

Mind you, I’m not going right to the coolest stuff. We’ll start slow and build.

Generate CRUD

There’s a small market on code generators for SQL Server. Why? Because most of the queries, the CUD part of CRUD, can be built completely through generation. There just is no reason why SSMS can’t do this on its own. But, instead of having to go to an outside tool or work with code bases other than TSQL, you can just right click on the table you’re interested in and one of the new context menu choices is “SSMS Tools” and right under that, “Create CRUD…” Clicking on it opens a new query window with a set of stored procedures all set up to add, update, remove or read the data from the table selected. It’s that easy. The statements are well formatted too with DROP statements before the create statements so that you can run this as needed when you change your structures.

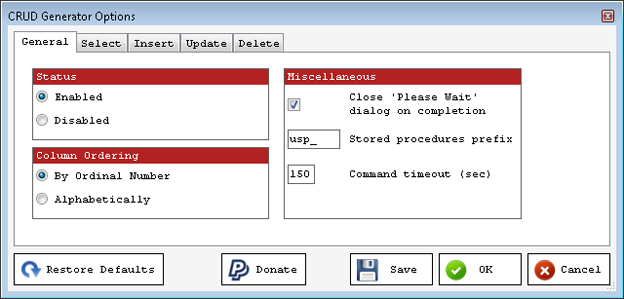
It gets better though. You’re not dependent on the structures that Mladen has provided. If you go to the SSMS Tools menu, there’s a list of options to modify different functionality. CRUD Generation is right there with some of what you can control as shown in Figure 1:
CRUD generator options

Figure 1

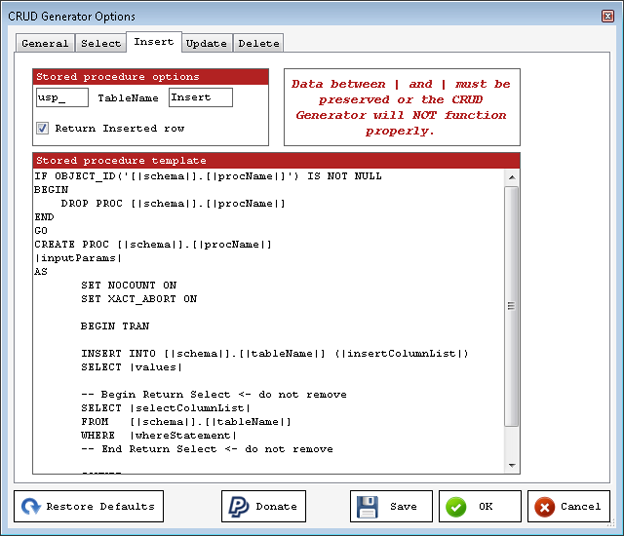
As you can see you can turn the functionality on or off. More importantly, you can control column order, set stored procedure prefixes and others. But the important stuff is on the next four tabs. You’re not dependent on Mladen’s choices for how to format and layout your procedures (although I don’t have any problems with his choices). If you wanted to put a standard TRY/CATCH error handler in your Insert statements, all you have to do is click on the tab and modify the query you find there, just like you see in Figure 2:
Modifying the query

Figure 2

All you have to do is follow the instructions and you can modify these procedures so that they work exactly the way you’d want them to.

One change I’d like to see, make it so that I don’t have to generate the Read procedure because those are mostly not simple, select from one table, affairs on systems I’ve worked with.

Connection Coloring

I’ve never in my life done something like what I’m about to describe, but I’ve heard that others have done so. You hit execute on that RESTORE DATABASE script and you set it to restricted user and put ROLLBACK IMMEDIATE in there because the developers on the development server where you’re restoring the database are never logged out even though they say they are and then your eye drifts down to the bottom of the screen… wait, that’s not DEV02\BoringOldDevServer. It’s PROD42\YouBetterGetYourResumeCleanedUpServer. Oh… *******…

Not that I’ve ever done that, or at least, there are no living witnesses that I’ve ever done that. Same thing really.

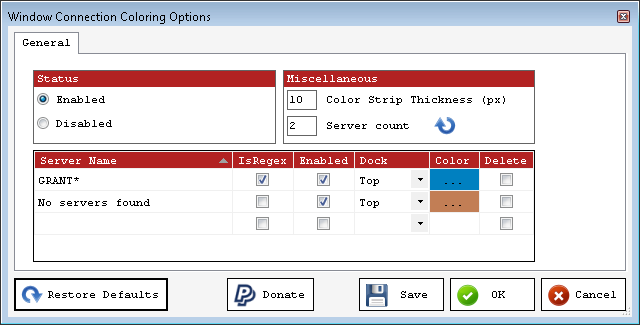
That’s where Windows Connection Coloring comes in handy. If you go back to the SSMS Tools menu you can find the appropriate menu and open the options window. Once the window is open, you can supply a server name, or, you can use regular expressions to define a pattern, so that you can set a group of servers up to behave a certain way. Figure 3 shows how I configured it locally:
Configuring Connection Coloring

Figure 3

If you do type in a regular expression, make sure you also select the “IsRegex” checkbox. Once you have things set up appropriately, you’ll see a colored bar at the top of your query window so you can be very aware of which server or set of servers you’re currently connected to. Figure 4 shows the bar on display:

The colored bar displays

Figure 4

I realize this is a pretty simplistic little thing, but if a simple little thing can prevent a production outage, it’s pretty cool. In keeping with my irritate Mladen with more suggestions though, since you can format the bottom color on connections individually, it would be good if this also updated that color so that you could see the color chosen for a particular connection on the top and the bottom of the query window.

Tab Sessions

New with Version 2 of SSMS Tools Pack is the Tab Sessions. This little bit of functionality keeps track of the tabs that you have open in SSMS and the TSQL inside those tabs. On a periodic basis (set within the options screen) it will save the tabs and the code. Then, say after a exiting and reentering SSMS you can hit the Restore Session button on the toolbar and it will reopen your tabs. Which is really cool, but it gets better.

If you go to the SSMS Tools menu and to the “SQL History” menu there, you can see the “Tabs History Management” menu choice. Clicking on that will open up a collection of different sets of tabs going back in time. You can see an example in Figure 5:

Tab selections history

Figure 5

It’s cool that you can scroll through these and pick one to restore, but what’s really cool is that you can then click on the tabs, like I have on the center one, and scroll through the code on that tab to ensure it’s the one you want. I’m digging this in a major way.

One major issue that I do have with it though, and this isn’t just another irritate Mladen request, is that while it knows which TSQL I have in a tab, it’s ignorant of the fact that that TSQL is from a file, so it will restore the TSQL to the appropriate tab on your window, but it won’t link it back up with the file that you had it open from. If you continue editing that TSQL, it won’t be saving to the file until you choose save and overwrite what you saved originally.

Execution Plan Analyzer

I’ve saved the coolest new feature for last. SSMS Tools integrates with your execution plans. There’s a button on the SSMS toolbar, “Show/Hide Execution Plan Analyzer.” Click on that button when you have an execution plan open in SSMS, any plan, even from a file, and your execution plan screen will suddenly change to look like Figure 6:

The Execution Plan Display

Figure 6

What you’ve got are different sets of functionality. Across the top are three buttons, offering you the ability identify the highest cost operation, search operators, and get suggestions on plan improvements. Yeah, you heard me, it’ll help you turn your queries.

The first piece of functionality, identify the highest cost operation, that’s hardly worth talking about on a plan that looks like the one above. But how a plan that looks like Figure 7?

Complicated Execution Plan

Figure 7:

Yeah, that’s one of the hairiest plans I’ve ever seen and I sure would have used this to browse through that plan (I used XQuery to find the costliest operators, worked, but it wasn’t pretty like this). You can adjust it too so that it shows more or less operations based on their cost by using the little slider bar right above it. The tool tip will show the name of the operator and the cost and clicking on it will take you to that operator within the plan. That’s extremely handy.

But, you can adjust the default values, and you can pick other properties from the Options window and have them bubble to the top. More interested in high numbers of Estimated Rows, change the property and you’ll see those operations that exceed the value that you supply on the bar on the left side of the screen. Again, very handy.

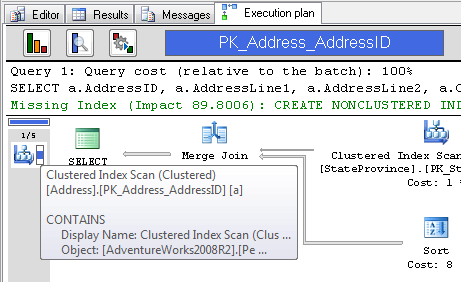
Next, you can search for operators. Want to know if you have a Sort operation in that mess of icons? Click the button and type in the term. You’ll see any and all Sort operations. But, it gets better. What if you’re curious that the primary key was used in the query. Type that in and you’ll see results like Figure 8:
Displaying the Primary Key

Figure 8.

I left the tooltip up so that you can see that SSMS Tools Pack searches inside the operators to find the things you were interested in.

Now, what about this tuning help? I’ll quote Mladen on this one:

It goes through your plan finding most common problems and gives you the usual solution for each one. This feature isn't meant to replace manual analysis but it will find the usual problematic spots that you can fix up fast.

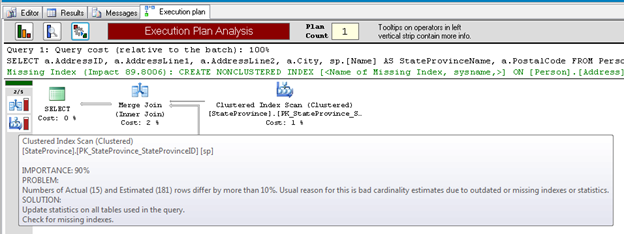
The query I gave it is very simple and has a couple of issues, primarily structural. You can see that SQL Server thinks I need a different index. Let’s see what SSMS Tools Pack says I ought to do about it.
Spotting the Errors

Figure 9:

It called out two issues, the Merge Join, and the Clustered Index scan that you can see in Figure 9. On both it pointed out that my estimated number of rows and my actual number of rows differed by a significant amount. This is true. I use this query to demonstrate bad parameter sniffing. The suggested solutions were to update the statistics on all tables used in the query or to check for missing indexes. These are excellent suggestions. Neither will work in this case because I’ve got a skewed data set (like I said, this is my demo code and it’s broken on purpose), but nonetheless, based on the information provided, these are the same recommendations I’d make myself. I’m impressed.

And More

Yes, there’s more. I can’t cover everything without generating about 50 pages of documentation to go through all the functionality and all the control over that functionality that you get. Here’s a quick run-down on some of the stuff I didn’t cover:

SQL SnippetsSearch Table/View/Database DataRun Scripts on Multiple ServersSearch Results in GridCustom Scripts from Object Explorer

Mladen did a nice job of documenting all the functionality, including the parts I didn’t mention.


This article was syndicated from simple talk.

Using Google Apps for cloud storage, backup and sync

Product Reviews 3 Comments »

I have been using a product called SugarSync for a while to sync my documents between home and office and also share with other staff in my company. After I discovered that SygarSynchad been deleting files by itself and nor syncing files it should be  it had to go, so it was time to look for a new solution.
Being a Google Apps user I already make use of Google Docs and think it is great for online editing and sharing docs, so I thought I could just use this as a replacement for SugarSync. If I could upload all my files to Google Docs then I wouldn't need to sync them between my machines as well, however having to uploading thousands of files initially via the Google Docs interface and then download and upload them if I wanted to work on them locally would be a pain in tha ass, better if I could somehow map a drive to Google Docs and use it as cloud storage that would be great I thought, also Google Docs is limited to 1GB of disk space which isn't really enough.

Thankfully all of these issues are easily solved.

Get More Storage

It turns out you can purchase additional disk space for Google Docs, although the option to do this is hard to find and simply does not exist on some Google Apps accounts.

Login to your Google Apps account and go to your Account Settings page.
On this page you should see your storage space and a "details" link which will take you to a page to buy more space, on my Google Apps for business account I have the link, but on my Google Apps FREE account the link is not there. HERE is the direct link in case you don't see it.

The additional storage prices are actually shockingly cheap, I doubt you will find a better deal anywhere.

20GB ($5 USD per year)
80 GB ($20.00 USD per year)
200 GB ($50.00 USD per year)
400 GB ($100.00 USD per year)
1 TB ($256.00 USD per year)

Using your Google Apps storage

Access cloud storage like a local drive

Backup files, folders to Google Apps

Sync data across multiple computers

Secure your data with military grade encryption

Here are some productsI tried out which some or all of these features.

1. Memeo Connect for Google Apps

Memeo Connect is a desktop application available for both Mac and PC (XP and higher) which lets you view files on both your desktop and within Google Docs. In the software program, files and folders already online are downloaded to your computer. Local files not yet online can then be moved to the appropriate Google Docs folder via drag-and-drop. The service is relatively simple to use as it presents your documents in an easy-to-navigate window while also incorporating Google's online features like starred files and shared folders.

One major drawback to Memeo Connect is that there's no automatic synchronization option. That means you can't monitor a local folder or folders for new files or changes and then have those documents seamlessly synced to Google's online service. This feature should arrive in a future update, however, so don't let its lack of inclusion be a deal breaker for you if the service fulfils all your other needs.

For personal users of Google Docs, the biggest drawback to Memeo is that the service is only available to users of Google Apps Premier edition, a business-level version of the service which also offers calendaring, groups, Web site creation tools, and video sharing to corporate users for $50 per user per year. Memeo Connect itself costs an additional $9/year.

Memeo connect is also still in Beta and has bugs, when I tried it out I found my folders got duplicated and the hierarchy was not displayed correctly, sub-folders were displayed in the wrong parent folder etc, I also found it a bit odd that they charge for a beta product. Memeo did not work for me and was a complete #fail.


2. SyncDocs

Like the popular applications Dropbox and SugarSync, Syncdocs quietly uploads and downloads your files in the background. Whether you're editing an existing file or creating a new one, unlike Memeo, Syncdocs keeps a watchful eye on your folders and springs into action whenever a change is detected.

The setup process is very simple, with little more to do than clicking a few "next" buttons. You'll need a Google account, of course and Microsoft's .NET 3.5 Framework is also required, but Syncdocs will automatically perform the installation if your computer doesn't already have it.

Once Syncdocs is installed, you'll be asked to enter your username and password. Once your credentials have been verified by Google's server, any files you currently have stored on Google Docs will be downloaded to the folder Syncdocs creates on your hard drive (you can customize its location at any time). You'll also notice a new drive letter on your My Computer screen (usually G:) which provides quick access to your newly-attached Google Docs cloud storage.

If you collaborate with other users on your documents, Syncdocs can process revision history and keep files and folders others share with you synchronized as well. You can even tell the program to open supported file types stored on your computer (such as those in your My Documents folder) using Google Docs in your Web browser for viewing or editing. If you're trying to break completely free of desktop office applications, it's a feature that will certainly help you make the move.

Sadly SynDocs also did not deliver the goods for me, the G drive did not map to Google Docs and I was not able to access my files or upload/download or do anything useful with it. I did try contacting their support to resolve my issues, it took them days to reply to each email, and every response was shorter and less helpful than the last, I soon got fed up and uninstalled and moved on to Gladinet. #Fail.

SyncDocs in action

3. Gladinet Cloud Desktop

These days it’s possible to access many cloud storage providers outside of a web browser, and Gladinet Cloud Desktop supports several of them. The Starter Edition allows you to mount a variety of online providers – including Amazon S3, Windows Live Skydrive, Box.net and of course Google – as separate folders under a virtual network drive called, unsurprisingly, My Gladinet Cloud Storage.

After installation, the setup wizard takes you through registration and then lets you connect to each of your online accounts: click “Add My Cloud Storage Account” and follow the wizard through to connect to your chosen account(s). Note the final step of the wizard – all about syncing folders with other PCs you own – is a Pro feature only, so un-tick this unless you plan to upgrade later.

Once done, just keep adding accounts until you’re done, then click Finish, at which point you’ll be taken to the Gladinet Management Console where you can review your settings, add more providers or configure other aspects of the program, although most of these features – such as Backup and Restore, and Cloud Sync Folders – are restricted to Pro users only.

And that’s it: just click Start > Computer and you’ll see your new virtual drive – open this and you’ll see folders representing each cloud-based service, which you can drag to and drop from like any other folder on your PC. Note the Starter Edition will only allow you to transfer up to 1,000 files in any one go, but this should be ample for most people.

The Professional Edition, which costs $49.99 has no restrictions over file transfers, plus offers better performance and enhanced security as well as the additional features already mentioned.

This is the solution I am currently using as it worked as advertised right out of the box, and after contacting their support with a few questions I found them responsive and helpful, replying within a couple of hours each time.

The only issue I have found so far is a small bug if you use multiple monitors, the Gladinet menu that should show on your Mapped drive is stuck on one my monitors desktop and is inaccessible, but it is not a showstopper and doesn't make the software any less usable.

Gladinet Cloud Desktop in action

The WebResource.axd handler must be registered in the configuration to process this request

ColdFusion , Windows 2008 Server 3 Comments »

Has this crop up a few times, and there are all kinds of articles on the web giving complex workarounds which simply did not apply in my case.

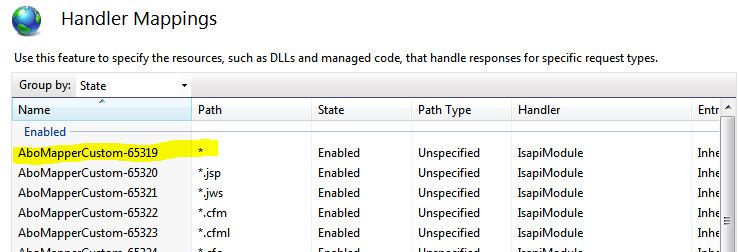
The cause in my case was ColdFusion, specifically the wildcard (*)  handler mapping, because this handler tries to process the request first to see if the file being requested is CFML, if not then it returns the request back to IIS, which thus causes the above error.

The solution is simply to remove the wildcard handler mapping.

image

If you need to run CF and ASP.NET on the same site then you need to do so without the wildcard handler mapping. Unfortunately the regular handlers don't actually work as they point to jrun_iis6.dll , and I have no idea why they are even created, perhaps some legacy thing.

So you have to  change all the standard handlers (.cfm, .jsp etc) to point to the jrun_iis6_wildcard.dll instead of jrun_iis6.dll, and CFM pages will now work happily with ASP, PHP or anything else.

Powered by Mango Blog. Design and Icons by N.Design Studio
RSS Feeds