
Cloudflare is a free DNS proxy service and has become the ubiquitous solution for any small website/business (as well as hackers, warez, porn or any controversial blogger sites) that want to hide their IP address and by extension, their hosting provider by hiding behind a proxy server.
In addition to the anonymising proxy service, it also has a bunch of neat caching, website performance and security features and DDOS protection too which can be a super-easy way to improve the performance and security of your website with very little effort.
There is no denying that the free version of Cloudflare is a very useful service. It does what t says on the tin and best of all, the free plan is suitable for most small business websites.
The problem is that many folks only do the bare minimum when setting up Cloudflare, which is fine if all you want is the caching and performance features. But if you also want to reliably hide your IP/host and have the DDOS protection then additional steps are required, which many (I suspect most) folks do not take.
Bypassing Cloudflare
If the required steps have not been taken to correctly and a domain is not fully and securely setup behind Cloudflare, then it is surprisingly easy to find out the origin servers IP and access it directly, thus bypassing Cloudflare completely.
The FREE plan that most people use will only proxy http requests, so everything else such as FTP, email, SSH etc has to be set to not use the proxy, which is DNS only and signified by the grey cloud.
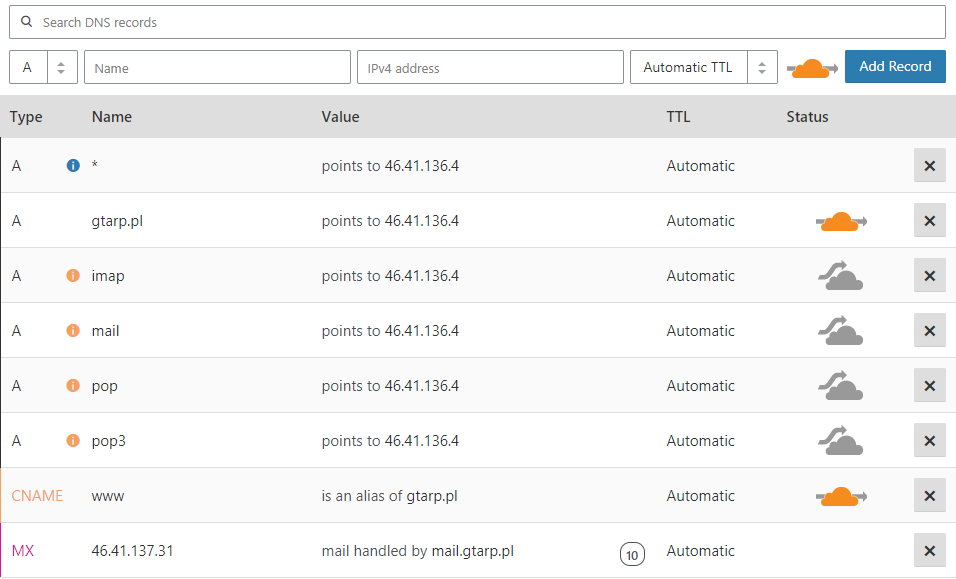
If any of those services/DNS records which are not using the proxy (grey cloud) are hosted on the same server as your website, then you have revealed your origin servers IP address.
Any malicious hacker can then easily access your origin server directly, completely bypassing the Cloudflare proxy. This is easily done simply by using your local hosts file.
If you are using shared hosting, then you usually have everything on the same server (mail, dns, ftp, web, cpanel etc) and thus all your DNS records point at the same IP.
Here are some of the common records people have pointing to the origin server, which cannot use the Cloudflare proxy either because they are not an http service or use a non-standard port (not 80 or 443).
- ftp.domain.com
- mail.domain.com
- cpanel.domain.com
- whm.domain.com
- MX records (which point to mail record)
- testing.domain.com
- SPF record
And usually, a whole bunch more which are created by your control panel.
So if I were a hacker or person with malicious intent, all I need to do is run a few lookups to find out all your dns records, and then test the IP addresses I find to see if any of them are your websites origin server and if so, do a reverse DNS lookup on that IP to find the hosting provider.
But let’s say you have been a bit savvy and have taken appropriate steps to hid your origin server IP and have also proxied your MX records as well, then what else can I do?
Well, my next step would be to send an email to a non-existent address @ yourdomain.com, which will result in a bounce message. In the headers of that bounce message, will be the IP address of the email server.
So if your email is hosted on the same server as your website, which is usually the case with shared hosting, then the hacker now has your origin IP, and can access your website directly, bypassing Cloudflare.
Another option would be to simply fill in your contact form or subscribe to your newsletter. Both of which are going to send me a confirmation email, which will also likely reveal your origin server.
For other ways that hackers can find your origin IP, take a look at this article by Gwendal Le Coguic @ Detecify.
Why is bypassing CloudFlare a problem?

Again this rather depends on why you are using Cloudflare to begin with. If you are only using the caching/performance features and nothing else, then it probably will not matter to you much. But if you are using Cloudflare for security or anonymity, then you have now lost both of these.
Once a hacker knows your origin IP, they can bypass every single feature that Cloudflare is providing for you, E.G.
- DDOS protection
- Web Application Firewall
- Access controls
- IP restrictions
- Page rules
- SSL encryption
If you have sections of your site protected by CF access controls or IP restrictions (such as your WordPress admin), then the hacker can freely bypass this and access all pages on your site.
If you are using the WAF (Web Application Firewall) to protect your site from intrusions, malware and brute force attacks, then this can also be bypassed.
An attacker will be able to launch a full-scale DDOS attack on your server once they know your IP, which will not only affect you, but every other customer on that server and probably the host’s network.
If you are using Cloudflare to hide the identity of your hosting provider, so that disgruntled or malicious companies or individuals cannot harass your hosting provider to take your site down because they did not like something you posted on your blog.
Once your origin IP is known, you lose all of these things.
How to protect your origin server IP
- Do not have any DNS records which point directly at your origin IP without being proxied.
- For non-http services that cannot be proxied, such as FTP, then simply do not have a DNS entry at all (e.g. ftp.yourdoamin.com) and instead use the IP address directly to access FTP.
- Proxy your email through a spam filtering service or use an external email solution instead, such as G Suite, Office 365, Zoho etc.
- Do not send any outgoing mail from the shared hosting server. Either send through your external email provider or use an SMTP relay service such a Mailgun or sendgrid.
- Disable XML-RPC Pingback on your website
- If you have any sub-domains, make sure these are also proxied and apply the same rules. Unless of course they are hosted elsewhere and do not need protecting.
At the end of the day, even if you take all the steps possible to hide your origin, it is possible to bypass cloudflare, you are simply relying on the fact that nobody will find your IP.
If security is a major concern for you, then ideally you need to be looking at a dedicated hosting solution where you have direct firewall access and can restrict incoming requests and block anything not coming via cloudlfare.
How to prevent Cloudflare bypass on shared hosting
If you are using a shared hosting provider, you will likely find it impossible to hide your original IP for the reasons mentioned above, at least not without spending more money.
Here’s a alternative solution involving a Cloudflare Worker, a few .htaccess directives, and a Cloudflare Firewall Rule, which will help you better lock down your site to the cloudflare IP instead or or as well as hiding the origin IP.
With a very simple Cloudflare Worker, we can add a request header that Cloudflare will send from its edge to your origin, and therefore won’t be visible to site visitors. The word “edge” refers to any of Cloudflare’s over 200 datacenters, and “origin” to the server at your hosting provider where your website is located.
As long as you keep the header name and value secret, any request not coming through Cloudflare will trigger a rewrite condition at the origin server, and will be redirected back to, well, Cloudflare — where the Firewall Rule will block it.
The Worker
This worker was adapted from this recipe:
addEventListener('fetch', event => {
  event.respondWith(handleRequest(event.request))
})

/**
 * Send header to origin, allowing for
 * .htaccess to block requests
 * not coming from Cloudflare
 */

async function handleRequest(request) {
  // Make the headers mutable by re-constructing the Request.
  request = new Request(request)
  request.headers.set('Secret-Header', 'SeCrEt-k3y')

  return await fetch(request)
}
Copy
The header name and value could be anything permissible under Apache’s specifications. But you should refrain from using non-alphanumeric characters, other than perhaps a dash or an underscore, as they may lead to parsing issues during the chain of events.
To confirm the Worker is working properly and sending the specified header you set on Cloudflare, you can add an .htaccess directive to make your origin server return that request headers back as a response header. So if you name your header “Secret-Header”, you can try adding this directive to your .htaccess file:
Header echo Secret-HeaderCopy
The above .htaccess directive takes no value, only the name of the header.
You can verify the presence of the header and value using your browser’s Developers Tools or similar web page inspection feature.
Once you are satisfied that the Worker is doing its job correctly, you should rename the header, and add the directives to your .htaccess file.
.htaccess
Place the following directives at the top of the.htaccess file.
# Route visitors not coming from Cloudflare to, well, Cloudflare
<IfModule mod_rewrite.c>
RewriteEngine On
RewriteBase /
# Both the header and the value should be kept secret
RewriteCond "%{HTTP:Secret-Header}" "!SeCrEt-k3y"
# Uncomment and edit w/ IP of services such as certs, cron, Softaculous etc
# RewriteCond "%{REMOTE_HOST}" "!^xxx\.xxx\.xxx\.xxx$"
RewriteRule .* "accessdenied.php" [R,L]
</IfModule>Copy
These directives check every request to see if it comes with a request header named “Secret-Header” and if its value contains or not the string “SeCrEt-k3y”.
Requests coming from Cloudflare will have the proper header and key, and therefore will not be redirected.
But requests coming directly to the server, bypassing Cloudflare, will not have the header, or not have the key, and will be redirected to a non-existing file. You can call this file anything. It is named here accessdenied.php.
To verify that the .htaccess is working properly and is actively blocking attempts at reaching your site via IP address, you can use the following Curl command in your command line terminal:
# Replace example.com/1.2.3.4 with your domain and its IP address
curl -svo /dev/null https://example.com --connect-to ::1.2.3.4Copy
The response may contain lots of information on the SSL negotiation, but should also include the following lines, confirming the redirect to the accessdenied.php URL:
< HTTP/2 302
< location: https://example.com/accessdenied.phpCopy
Firewall Rule
The name accessdenied.php points to a fictitious, non-existing file. You need to create a Firewall Rule so that Cloudflare blocks it should the bot follow the redirect set by the .htaccess directive above (not all bots follow redirects):
(http.request.uri.path eq "/accessdenied.php")Copy
The Firewall Rule action should be set to Block.
The reason we prefer to redirect these requests to Cloudflare instead blocking them at the origin is because a redirect consumes less bandwidth and CPU than a 403 error page. We could rewrite the 403 error page down to a few bytes, but we prefer to keep the site functional for legit visitors, and that includes meaningful error pages whenever they face one.
Blocking intruders at Cloudflare also sends the right signal to probing hackers, that your site has the right configuration in place.
One consequence of this approach is that if you monitor your origin server logs, you’ll find it may contain both regular 302s as well as 302s for the URLs the occasional bot may be trying to reach.
The Cloudflare Firewall Events log will then have the entries for the blocks executed for URL "/accessdenied.php".
Legit Bots, Cronjobs, Etc
After implementing this solution, you may find that there are 302s on your server log that have no match on the Firewall Events log. This is because bots may be programmed not to follow redirects.
Also, it’s important to note that legit bots may be accessing directly your site to provide services such as cronjobs, certificate renewals etc. For these situations, there’s a bypass rule on the .htaccess directives above. You just need to uncomment and edit it to include the service’s own IP address.
Cost Issues
Cloudflare Workers is a paid service, and it starts at $5/month for the first 10 million requests. If you exceed that limit, you’ll be charged $0.50 per up to 1 million additional requests.
While this setup was tested in a Cloudflare Workers “free tier”, it may not be ideal to use the free tier on a production website, as it has some limits. Those monthly and hourly limits, if reached, will make your site break and generate 1015/1025 error pages for the duration of the rate-limiting period — something about which site owners have no control. Feel free to try it though. Just because it didn’t work on my site it doesn’t mean it won’t work on yours.
Keep in mind that Cloudflare will count each request, not each visit. If one visitors goes to a landing page on your site, that page’s HTML will request many other URLs for the images, fonts, CSS and JavaScript files, and so on.
Though the header will only be sent when Cloudflare doesn’t have the requested file in its cache, the worker will run (and therefore count towards your monthly limit) every time a visitor navigates on your website.
You can keep a tab of your requests by visiting the Workers Analytics panel at your dashboard on Cloudflare.
As with any usage-based Cloudflare product, I strongly recommend that you set a notification to avoid billing surprises. When properly set, Cloudflare will notify you via email once a certain volume of Workers requests have run. You can set an email notification by visiting the Billing section of your account on the Cloudflare dashboard. Make sure you include an email that doesn’t have delivery issues. Instead of using, for instance, the standard admin email of your WordPress installation, perhaps you should use Gmail, Outlook, or any other trusted third-party email provider.